
How to Screenshot on Mac

How to take screenshot on Mac - If you used the Windows system for a long, and now intend to switch to a Mac then you might be eager to know the different functions in a Mac. One of the characteristics and practice is necessary to take screenshots on Mac. You might be curious to know how to take screenshots without using the Print Screen key on the keyboard. Another reason to take screenshots on your Mac can be working. Do not worry I provide a number of methods to screen shots, including those available in the MacOS versions of High Sierra, Mojave or Catalina. In addition, macOS Mojave has provided a new tool tool screenshot and keyboard.
How to take screenshots on Mac - Here is the detailed description on how to screenshot on a Mac
BY THE USE OF KEYBOARD COMMANDS
How to take a screenshot on a Mac if you capture the screenshot of the entire screen easier and more comfortable or only part of it is by using the keyboard commands MacOS. You can ask any Mac user about this method. By default, all own methods Apple will take and save your screenshot on the desktop itself. If you just want to copy the screenshot to the clipboard, hold down the Ctrl key while you press a key combinations listed below.
To screenshot the entire screen:
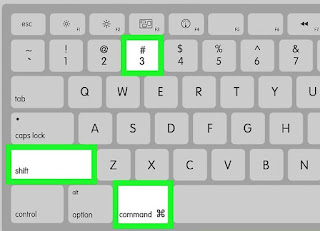
Press Command + Shift + 3 Keys simultaneously to capture the screenshot of Mac entire screen. This will also save a screenshot of your whole screen on your desktop. Incidentally, you can also use the same key combination with Control key to save the screenshot to the clipboard yours.
To screenshot a selected portion:

You can also press Command + Shift + 5 keys simultaneously if you’re using macOS versions like Mojave or later, which will give a screen to display option showing what will be captured and that can be moved or resized as needed. This key combination also provides a small bottom panel of your screen with your options screenshot.
Your selected capture captured screen will be saved to the desktop. You can also press the control to save the screenshot to the clipboard.
There are a total of three screenshot of buttons that can be used to capture the entire screen, a window or a selected area of your screen. To exit the panel screenshot, the user can use the X button on the left side or press Esc.
The options button is present on the right side which allows you to choose where to save your screenshot - desktop, clipboard, documents, messages, mail or preview and provides a period of 5 or 10 seconds so the user can align elements that might otherwise be lost when the user engages the screenshot tool.
To screenshot a single window:

Step 2: Hit the Spacebar. And, the pointer turns into a camera type icon.
Step 3: Now, the user will see the whole window, Levite more will be described in blue. This shows that only this window will be captured when the screenshot is taken.
Step 4: Select the window you want to screenshot and then click on the window and an image of it will be saved on the desktop.
The image of the screenshot you have saved will be a PNG transparency of the window and its shade. If you do not want the shadow to record with the PNG, you can press the Option (Alt written on some keyboards Mac) as you click to save the image.
Even as other methods of screenshot, add the control to the key combination to ensure that the image is saved to the clipboard instead of your desktop.


2 Comments
Nyc article
ReplyDeleteIts great helpful information
And i will suggest you about us, contact us, disclaimer, and privacy and policy add on your blogger . If you want to fast Adsense approval
Nyc article
ReplyDeletebro